Sheesh, let me start off by saying ChatGPT isn’t taking anyone’s job any time soon. I decided to complete the coding segment of this project with ChatGPT (shorting this to GPT from here on) on openAI mostly as an experiment to see how it would go start to finish. It did not go well. It took about 3 and a half days since the last article/coding session. It didn’t just take a long time either, it was extraordinarily frustrating.
The biggest problem was GPT seems to have short-term memory loss. I offered a bit of advice in my ChatGPT article, one of the main points was to name your application for reference for communicating specifically with GPT. Whenever I ask GPT to revise code I also ask it to repost the complete application code. If you don’t do this you will have a lot of trouble, mostly because it will shift functions all over the place for no reason making it very difficult to locate the code that changed and ensure you have all the functions back in the code, until it crashes.
For $20 per month you get 25 messages per 3 hours on the GPT 4 model. This means each error wastes a very finite amount of resources. I started off the “conversation” with the request to always post the complete code every time with zero omissions because I’ve already had a good deal of trouble with this. I still constantly had to tell it to post the entire code. Additionally there’s a character limit per message so usually the complete code is at least 2 messages, sometimes 3. All of this lead to me only getting 10 or 15 useful messages per 3 hours.
Anyway, the biggest problem was GPT would often omit already completed functions from the code without warning and because it also frequently reshuffled the order of the code it was quite difficult to identify these issues until the code was run and an error caused a crash. It’s also worth noting this is node.js which is javascript which is not compiled meaning there’s no code validation prior to launch.
This should run on any system running Node.JS but I’m running it on Debian, my go to for anything I can get away with running on Debian. Don’t forget to update the IP’s and ports and the Twilio keys and phone numbers. I’m using a Twilio trial account for now. It gave me something like $15 and a number. I have no idea how long that will last. Also with a trial account you have to verify the destination number, which is fine with me.
Please note if you attempt to build this thing and use my code I did my best to test it (something like 30 hours of cycles) but it might not work right and might set your house on fire. I’m also playing with enough electricity to harm or kill. Please read the disclaimer at the bottom of the page but also remember anything you do with my work is on you, I accept no responsibility. By reading any single character on this page you agree to these terms. Got em.
So after all that here is the code:
SmelterServer.js
const express = require('express');
const bodyParser = require('body-parser');
const dgram = require('dgram');
const udpClient = dgram.createSocket('udp4');
const twilio = require('twilio');
const app = express();
const port = 3000;

app.use(bodyParser.urlencoded({ extended: true }));
app.use(bodyParser.json());

let confirmationTimeoutId;
let nextPacketTimeoutId;
let timerTemperatureArray = [];
let currentTimerIndex = 0;
let watchdogTimerId;
let retryAttempts = 0;
let remainTimeMonitor = 0;
let startConfirmationTime;
let currentTemperature;

const destinationIP = '192.168.1.0'; // Destination IP address
const destinationPort = 3000; // Destination port
const listeningIP = '192.168.1.1'; // Listening IP address
const listeningPort = 3000; // Listening port
const watchdogTimerDuration = 30000; // Watchdog timer duration in milliseconds
const retryInterval = 30000; // Retry interval for sending repeat packets in milliseconds
const maxRetryAttempts = 3; // Maximum number of retry attempts
const confirmationTimeoutDuration = 1000; // Timeout duration for confirmation packet in milliseconds

// These values are available in your Twilio account
const accountSid = 'sidgoeshere';
const authToken = 'authtokengoeshere';

const client = twilio(accountSid, authToken);

app.get('/', (req, res) => {
  res.send(generateHtml(timerTemperatureArray));
});

app.post('/submit', (req, res) => {
  const { timer, temperature } = req.body;

  if (Array.isArray(timer) && Array.isArray(temperature) && timer.length === temperature.length) {
    timerTemperatureArray = timer.map((t, i) => ({
      timer: parseFloat(t),
      temperature: parseFloat(temperature[i]),
    }));

    currentTimerIndex = 0; // reset the timer index
    clearTimeout(confirmationTimeoutId); // Clear the existing timer if any
    clearTimeout(nextPacketTimeoutId); // Clear the existing next packet timer if any
    sendNextPacket();
  }

  res.redirect('/');
});

app.listen(port, () => {
  console.log(`Node.js app listening on port ${port}`);
});

function generateHtml(timerTemperatureArray) {
    const arrayHtml = timerTemperatureArray
    .map((entry) => `<li>Timer: ${entry.timer} min, Temperature: ${entry.temperature} °F</li>`)
    .join('');

  return `
    <!DOCTYPE html>
    <html lang="en">
    <head>
      <meta charset="UTF-8">
      <meta http-equiv="X-UA-Compatible" content="IE=edge">
      <meta name="viewport" content="width=device-width, initial-scale=1.0">
      <title>Temperature Control Form</title>
      <script>
        function addRow() {
          const table = document.getElementById('tempTable');
          const row = table.insertRow(-1);
          const cell1 = row.insertCell(0);
          const cell2 = row.insertCell(1);
          cell1.innerHTML = '<input type="number" name="timer[]" min="0" step="0.1" required>';
          cell2.innerHTML = '<input type="number" name="temperature[]" min="0" step="0.1" required>';
        }
      </script>
    </head>
    <body>
      <h1>Temperature Control Form</h1>
      <form method="POST" action="/submit">
        <button type="button" onclick="addRow()">Add Row</button>
        <br>
        <table id="tempTable">
          <tr>
            <th>Timer (minutes)</th>
            <th>Temperature (°F)</th>
          </tr>
          <tr>
            <td><input type="number" name="timer[]" min="0" step="1" required></td>
            <td><input type="number" name="temperature[]" min="0" step="1" required></td>
          </tr>
        </table>
        <br><br>
        <input type="submit" value="Submit">
      </form>
      <h2>Current Timer and Temperature Array</h2>
      <ul>${arrayHtml}</ul>
    </body>
    </html>`;
}


function sendPacket(payload) {
  const message = Buffer.from(JSON.stringify(payload));
  udpClient.send(message, 0, message.length, destinationPort, destinationIP, (err) => {
    if (err) {
      console.error('Error sending UDP packet:', err);
    } else {
      console.log(`UDP packet sent to ${destinationIP}:${destinationPort}`);
    }
  });
}

function handleFailedCommunication() {
  console.log('Communication with destination failed after 3 attempts');
  // Add your logic to handle the failed communication here
  client.messages.create({
   body: 'Hello, smelter communication has failed.',
   from: '+8675309',  // your Twilio number
   to: '+580087734'     // the number to which you want to send the message
})
.then(message => console.log(message.sid))
.catch(error => console.error(error));
}


function processUdpPacket(packet) {
  if (packet.type === 'watchdog') {
    console.log('Watchdog response received. Resetting the watchdog timer...');
    clearInterval(watchdogTimerId);
    watchdogTimerId = setInterval(sendWatchdogPacket, watchdogTimerDuration);
    retryAttempts = 0; // Reset the retry attempts counter

	// new code to send temperature and remaining time to smelterMonitor
    let remainingTime = 0;
    if (currentTimerIndex < timerTemperatureArray.length) {

        remainingTime = timerTemperatureArray[currentTimerIndex].timer - packet.elapsedTime;
		console.log(`Remaining time (${remainTimeMonitor})...`);
		console.log(`Temp (${packet.temperature})...`);
    }
    sendUpdateToMonitor(packet.temperature);

  } else if (packet.type === 'confirmation') {
    console.log('Confirmation received. Scheduling next packet...');
    clearTimeout(confirmationTimeoutId); // Clear the timeout as the confirmation has been received
	remainTimeMonitor = Date.now();
    // Schedule the next packet based on the timer from the current packet
    const { timer } = timerTemperatureArray[currentTimerIndex];
    const timerInMilliseconds = timer * 60 * 1000; // Convert timer to milliseconds
    nextPacketTimeoutId = setTimeout(() => {

		client.messages.create({
   body: 'Hello, smelter cycle has completed',
   from: '+8675309',  // your Twilio number
   to: '+580087734'     // the number to which you want to send the message
})
.then(message => console.log(message.sid))
.catch(error => console.error(error));

      currentTimerIndex++; // Move to the next timer-temperature pair
      sendNextPacket(); // Send the next packet
    }, timerInMilliseconds);

	sendUpdateToMonitor(80085);
  }
}

function handleConfirmationTimeout() {
  console.log('Confirmation not received from destination');
  retryAttempts++;

  if (retryAttempts >= maxRetryAttempts) {
    clearTimeout(confirmationTimeoutId);
    handleFailedCommunication();
  } else {
    console.log(`Resending packet (${retryAttempts})...`);
    sendNextPacket();
  }
}

function sendWatchdogPacket() {
  sendPacket({ type: 'watchdog' });
}

function sendNextPacket() {
  if (currentTimerIndex < timerTemperatureArray.length) {
    const { timer, temperature } = timerTemperatureArray[currentTimerIndex];
    const timerInSeconds = timer * 60; // Convert timer to seconds
    console.log(`Sending packet with Timer: ${timer} min, Temperature: ${temperature} °F`);
    sendPacket({ type: 'temperature', timer: timerInSeconds, temperature });

    // Start the confirmation timeout

    confirmationTimeoutId = setTimeout(handleConfirmationTimeout, confirmationTimeoutDuration);
  } else {
    console.log('All timer-temperature pairs have been sent.');
	client.messages.create({
   body: 'Hello, smelter has completed all cycles.',
   from: '+8675309',  // your Twilio number
   to: '+580087734'     // the number to which you want to send the message
})
.then(message => console.log(message.sid))
.catch(error => console.error(error));
	retryAttempts = 0;
  }
}

function sendUpdateToMonitor(temperature) {
	if (currentTimerIndex < timerTemperatureArray.length) {
    const elapsedTime = Date.now() - remainTimeMonitor;
	const totalTime = timerTemperatureArray[currentTimerIndex].timer * 60 * 1000;
    const remainingTime = timerTemperatureArray[currentTimerIndex].timer * 60 * 1000 - elapsedTime;

	console.log(`Current cycle length: (${totalTime})...`);
	console.log(`Remaining time (${remainingTime})...`);
	console.log(`Temp (${temperature})...`);
    const http = require('http');

    const data = JSON.stringify({
        temperature,
        remainingTime,
		currentTimerIndex,
		totalTime
    });

    const options = {
        hostname: 'localhost',
        port: 4000,
        path: '/update',
        method: 'POST',
        headers: {
            'Content-Type': 'application/json',
            'Content-Length': data.length
        }
    };

    const req = http.request(options);

    req.on('error', error => {
        console.error(`Error sending update to monitor: ${error}`);
    });

    req.write(data);
    req.end();
	}
}


udpClient.on('message', (message, remote) => {
  const incomingData = JSON.parse(message.toString());
  processUdpPacket(incomingData);
});

udpClient.bind(listeningPort, listeningIP, () => {
  console.log(`UDP client listening for watchdog response on ${listeningIP}:${listeningPort}`);
});


// Start sending watchdog packets
watchdogTimerId = setInterval(sendWatchdogPacket, watchdogTimerDuration);
show less
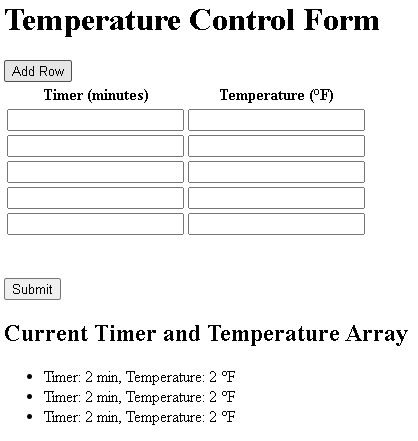
So you can see from that code we’re doing a lot of stuff. Here’s the webpage it hosts:
Nothing too fancy but it works. It starts with one row, click the button to add as many cycles as you want. Enter the duration you want on the left and the temperature you want maintained on the right.
From here the first set of values is sent to the MCU. The MCU confirms receipt and begins its work including counting the timer itself and monitoring and maintaining the temperature. There are a number of other processes that happen to keep everything running smoothly as well. There is a watchdog packet sent every 30 seconds. If the SmelterServer doesn’t get a response it sends an SMS message with Twilio notifying me something bad is happening. There is also a post message sent to the SmelterMonitor.js application at port 4000. This is the monitoring page to keep an eye on the smelter remotely.
And here’s the SmelterMonitor.js:
const express = require('express');
const bodyParser = require('body-parser');

const app = express();
const port = 4000;
const temperatureThreshold = 1.0; // Change threshold for temperature
const timerThreshold = 1000; // Change threshold for timer

app.use(bodyParser.urlencoded({ extended: true }));
app.use(bodyParser.json());

let currentTemperature = null;
let remainingTimer = null;
let currentTimerIndex = null;
let totalTime = null;

let currentData = { temperature: null, remainingTime: null, currentTimerIndex: null, totalTime: null };

app.post('/update', (req, res) => {
    currentData.temperature = req.body.temperature;
    currentData.remainingTime = req.body.remainingTime;
	currentData.currentTimerIndex = req.body.currentTimerIndex;
	currentData.totalTime = req.body.totalTime;
    res.status(200).end();
	console.log(`got data`);

});


/* app.post('/temperatureUpdate', (req, res) => {
  const { temperature, remainingTimer: receivedTimer } = req.body;
  const temperatureChanged = Math.abs(currentTemperature - temperature) >= temperatureThreshold;
  const timerChanged = Math.abs(remainingTimer - receivedTimer) >= timerThreshold;

  if (temperatureChanged || timerChanged) {
    currentTemperature = temperature;
    remainingTimer = receivedTimer;
  }

  res.sendStatus(200);
}); */

app.get('/', (req, res) => {
  const html = generateHtml();
  res.send(html);
});

app.listen(port, () => {
  console.log(`Temperature display app listening on port ${port}`);
});

function generateHtml() {
	console.log(`Temperature ${currentData.temperature}`);
	console.log(`Remaining Time ${currentData.remainingTime}`);
	console.log(`Timer Index ${currentData.currentTimerIndex}`);
	console.log(`Total cycle length ${currentData.totalTime}`);

  const temperatureF = currentData.temperature;
  const timerMin = currentData.remainingTime ? currentData.remainingTime / 60000 : null;
  const timerIndex = currentData.currentTimerIndex + 1;
  const totalTimeHTML = currentData.totalTime ? currentData.totalTime / 60000 : null;

  return `
    <!DOCTYPE html>
    <html lang="en">
    <head>
      <meta charset="UTF-8">
      <meta http-equiv="X-UA-Compatible" content="IE=edge">
      <meta name="viewport" content="width=device-width, initial-scale=1.0">
      <title>Temperature and Timer</title>
      <meta http-equiv="refresh" content="15">
    </head>
    <body>
      <h1>Temperature and Timer Status</h1>
      <p>Current temperature: ${temperatureF ? `${temperatureF.toFixed(2)} °F` : 'N/A'}</p>
      <p>Remaining time: ${timerMin ? `${timerMin.toFixed(1)} minutes` : 'N/A'}</p>
	  <p>Current Cycle: ${timerIndex ? `${timerIndex.toFixed(1)} ` : 'N/A'}</p>
	  <p>Total Cycle length: ${totalTimeHTML ? `${totalTimeHTML.toFixed(1)} minutes` : 'N/A'}</p>
      <p>
        <a href="http://192.168.1.1:3000">Timer and Temperature Entry Page</a>
      </p>
    </body>
    </html>
  `;
}
show less
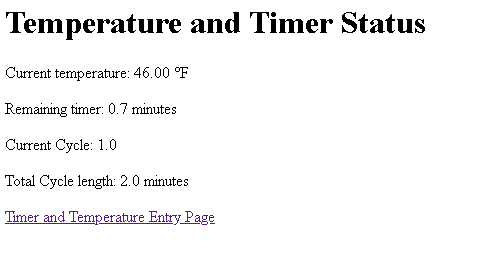
And here’s what that page looks like:
As you can see its function is pretty simple. Take the values from SmelterServer, shove them in some variables, post some HTML so we can see what’s going on anywhere on my network. It’s also not 46 degrees in my office, the thermocouple seems to be quite a ways off but 30 degrees in the scheme of 1000s doesn’t mean much, plus that’s not actually the thermocouple that’s mortared into the smelter.
And lastly here is the SmelterMCU code designed to live on a NodeMCU/ESP8266:
#include <ESP8266WiFi.h>
#include <WiFiUdp.h>
#include <Adafruit_MAX31855.h>
#include <ArduinoJson.h>

// Replace with your WiFi credentials
const char* ssid = "ssid";
const char* password = "password";

const int outputPin = 14;             // Power output pin   D5
const int outputPin2 = 10;             // Power output pin   SD3
const int safetyPin = 12;             // Thermal runaway safety pin   D6
const int thermoCLK = 16;             //D0
const int thermoCS = 5;               //D1
const int thermoDO = 4;               //D2
const unsigned int localPort = 3000;  // Local port to listen on
float currentTemperature = 50;
unsigned long lastControlTemperatureMillis = 0;
const unsigned long controlTemperatureInterval = 5000;  // 5 seconds

Adafruit_MAX31855 thermocouple(thermoCLK, thermoCS, thermoDO);

WiFiUDP udp;

// State machine
enum State {
  IDLE,
  PROCESS_UDP,
  CONTROL_TEMPERATURE,
  WATCHDOG_CHECK
};
State currentState = IDLE;

unsigned long timerStart;
unsigned long timerValue;
float targetTemperature;
unsigned long lastWatchdogReceived;
const unsigned long watchdogTimeout = 150000;  // Adjust the timeout as needed

// Watchdog response variables
IPAddress remoteIP(192, 168, 1, 1);  // Set the remote IP address here
uint16_t remotePort1 = 3000;           // Set the remote port here

void setup() {
  Serial.begin(115200);
  Serial.println();
  Serial.print("ESP Board MAC Address:  ");
  Serial.println(WiFi.macAddress());  // if you have several dozen devices on your DHCP server this will be a big help for locating your ESP, I recommend a DHCP reservation so the IP doesn't change.
                                      // I didn't want to make it static because updating the code to change the IP is a pain.
  pinMode(outputPin, OUTPUT);
  pinMode(outputPin2, OUTPUT);
  pinMode(safetyPin, OUTPUT);
  digitalWrite(safetyPin, HIGH);

  // Connect to Wi-Fi
  WiFi.begin(ssid, password);
  while (WiFi.status() != WL_CONNECTED) {
    delay(500);
    Serial.print(".");
  }
  Serial.println("Connected to Wi-Fi");
  Serial.print("IP address: ");
  Serial.println(WiFi.localIP());

  // Initialize UDP
  udp.begin(localPort);
  Serial.printf("Listening on UDP port %d\n", localPort);

  // Initialize thermocouple
  thermocouple.begin();
}

void loop() {
  unsigned long currentMillis = millis();

  switch (currentState) {
    case IDLE:
      checkForUdpPacket();
      if (targetTemperature) {
        if (currentMillis - lastControlTemperatureMillis >= controlTemperatureInterval) {
          Serial.println("controlTemp triggered by time");
          controlTemperature();
          lastControlTemperatureMillis = currentMillis;
        }
      }
      break;
    //case PROCESS_UDP:
    //  processUdpPacket();
    //  break;
    case CONTROL_TEMPERATURE:
      controlTemperature();
      break;
    case WATCHDOG_CHECK:
      processWatchdog();
      break;
  }
}

void checkForUdpPacket() {
  int packetSize = udp.parsePacket();
  if (packetSize) {
    char incomingData[packetSize + 1];
    udp.read(incomingData, packetSize);
    incomingData[packetSize] = '\0';

    DynamicJsonDocument doc(256);
    DeserializationError error = deserializeJson(doc, incomingData);

    Serial.print("Received packet: ");
    Serial.println(incomingData);

    if (error) {
      Serial.print("Parsing failed: ");
      Serial.println(error.c_str());
      return;
    }

    if (doc.containsKey("type") && doc["type"].as<String>() == "watchdog") {
      currentState = WATCHDOG_CHECK;
    } else {
      // Parse timer and target temperature from the received data
      if (doc.containsKey("timer")) {
        timerValue = doc["timer"];
        timerStart = millis();  // Start the timer when a new packet is received
        Serial.print("Parsed timer value: ");
        Serial.println(timerValue);
      }
      if (doc.containsKey("temperature")) {
        targetTemperature = doc["temperature"];
        Serial.print("Parsed temperature value: ");
        Serial.println(targetTemperature);
      }

      // Send confirmation packet
      sendConfirmationPacket(timerValue, targetTemperature);

      clearUdpBuffer();
      lastWatchdogReceived = millis();
      currentState = CONTROL_TEMPERATURE;
    }
  }
}

void clearUdpBuffer() {
  while (udp.parsePacket()) {
    // read and discard the incoming byte
    udp.read();
  }
}


char* trimWhitespace(char* str) {
  while (isspace(*str)) {
    str++;
  }

  char* end = str + strlen(str) - 1;
  while (end > str && isspace(*end)) {
    end--;
  }
  *(end + 1) = '\0';

  return str;
}


void sendConfirmationPacket(unsigned long timerValue, float targetTemperature) {
  IPAddress remoteIp(remoteIP[0], remoteIP[1], remoteIP[2], remoteIP[3]);  // Set remote IP address
  uint16_t remotePort = remotePort1;                                       // Set remote port

  DynamicJsonDocument jsonPacket(128);
  jsonPacket["type"] = "confirmation";
  jsonPacket["timer"] = timerValue;
  jsonPacket["temperature"] = targetTemperature;

  String jsonString;
  serializeJson(jsonPacket, jsonString);

  udp.beginPacket(remoteIp, remotePort);
  udp.write(jsonString.c_str());
  udp.endPacket();
  Serial.println("Confirmation packet sent: " + jsonString);
}


void controlTemperature() {
  if (millis() - timerStart < timerValue * 1000) {
    currentTemperature = thermocouple.readCelsius();
    Serial.print("Current temperature: ");
    Serial.println(currentTemperature);
    Serial.print("Current timer: ");
    Serial.println((millis() - timerStart)/1000);
    Serial.print("Parsed timer value: ");
        Serial.println(timerValue);
    if (isnan(currentTemperature)) {
      Serial.println("Error reading temperature");
    } else {
      if (currentTemperature < targetTemperature) {
        digitalWrite(outputPin, HIGH);
		digitalWrite(outputPin2, HIGH);
        Serial.println("Heater on");
      } else {
        digitalWrite(outputPin, LOW);
		digitalWrite(outputPin2, LOW);
        Serial.println("Heater off, up to temp");
      }

      // Detect thermal runaway
      if (currentTemperature > targetTemperature + 100) {  // Adjust the threshold as needed
        digitalWrite(outputPin, LOW);
		digitalWrite(outputPin2, LOW);
        digitalWrite(safetyPin, LOW);
        Serial.println("Thermal runaway detected");
      }
    }
  } else {
    digitalWrite(outputPin, LOW);
	digitalWrite(outputPin2, LOW);
    Serial.println("Heater off, time up");
  }
  if (millis() - lastWatchdogReceived > watchdogTimeout) {
    digitalWrite(safetyPin, LOW);
    Serial.println("Watchdog failed system shutdown");
  } else {
    digitalWrite(safetyPin, HIGH);
  }
  currentState = IDLE;
}

void processWatchdog() {
  Serial.print("processWatchdog   ");
  lastWatchdogReceived = millis();
  IPAddress remoteIp(remoteIP[0], remoteIP[1], remoteIP[2], remoteIP[3]);  // Set remote IP address
  uint16_t remotePort = remotePort1;                                       // Set remote port
  float currentTemperature = thermocouple.readCelsius();

  char temperatureStr[10];
  dtostrf(currentTemperature, 6, 2, temperatureStr);

  DynamicJsonDocument jsonPacket(128);
  jsonPacket["type"] = "watchdog";
  jsonPacket["temperature"] = atof(temperatureStr);

  String jsonString;
  serializeJson(jsonPacket, jsonString);

  udp.beginPacket(remoteIp, remotePort);
  udp.write(jsonString.c_str());
  udp.endPacket();
  Serial.println(jsonString.c_str());
  currentState = IDLE;
}
show less
This code is fairly complicated but the function is pretty simple.
And that’s it, all done!